Snowflake is a SaaS (software as a service) data platform for its users to load and export data, execute commands, and process requests. It is built on top of the Amazon Web Services, Microsoft Azure and Google Cloud infrastructures, and has an industry-standard “shared responsibility model”. It saves cost and time for business. Snowflake saves organizations the hassle of allocating resources for purchase or maintenance of servers.Snowflake provides storage for sensitive data, but how does it secure this data?
Security model overview
The security model of Snowflake can be described as 5 steps:
- Access control
- Authentication
- Authorization
- Data Encryption
- Infrastructure
 Figure 1: Security model overviewIn this blog, I will focus on discussing access control and authentication.
Definition of Terms
Before we start, it is useful to define the key terms.
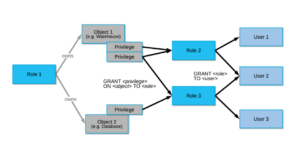
- Users – an identity entity. It is associated to a person or an application.
- Role – an entity to which you can define which privilege to grant.
- Privilege – the level of access to a securable object you grant to a role.
- Securable Object – any entity, such as a table, warehouse, database or schema, to which you would grant/deny access to a specific role. They are owned by users that create them.
Access control
Snowflake has a model called RBAC (Role-Based Access Control) as an approach to access control. This model assigns different privileges to a securable object to different roles, then these roles are assigned to a user The network access of Snowflake can be controlled via ‘Network Policy’ that enables users to allow/block certain IP addresses from connecting to their Snowflake account. The level of granularity can be applied at 3 levels:
- Snowflake account
- Outside integration
- User specific
Network Policies can only be created by the role Security Administrators (SYSADMIN) or higher. It can be created through a web interface or using SQL commands CREATE NETWORK POLICY.
Authentication
The authentication is required for all connections to Snowflake. After confirming the account is accessible, the next step is to authenticate the user.When an organization initially uses Snowflake, assigning roles and access is straight forward and simple. However, as employees move from project to project and team to team, managing their access becomes complicated. Snowflakes provide SCIM (System for Cross-domain Identity Management) and recommend users to use it for managing (creation, changes, delete) users and roles in Snowflake. This can be used on any system that speak SCIM such as Okta, Azure AD or any system that runs SQL commands.Snowflake provides 3 types of authentication:
- Built-in user authentication
- SSO for human, interactive use case
- Authentication for non-human users (programmatic, service account etc.)
Reference:
- snowflake.com. 2021. Overview of Access Control — Snowflake Documentation. Available at: https://docs.snowflake.com/en/user-guide/security-access-control-overview.html#access-control-framework
- snowflake.com. 2021. Snowflake Community. Available at: https://community.snowflake.com/s/article/Snowflake-Security-Overview-and-Best-Practices>
- com. 2021. Available at: https://www.snowflake.com/wp-content/uploads/2019/12/Snowflake-Security-Overview-Q4-2019-2.pdf


