Snowflake uses a hierarchical role model for defining access across its platform. Snowflake users are assigned to different roles which define which warehouses, databases, schemas, and tables they can access. This model makes it incredibly easy to manage access across an organisation’s Snowflake account.By default, Snowflake includes several system-defined roles, each with varying levels of access and capabilities. These roles may suffice for your organisation’s needs; however, it may be necessary to create a custom role to define more specific privileges to users. This article will provide a step-by-step guide on:
- Creating a new user
- Creating a custom role
- Assigning privileges to the role
- Assigning users to the role
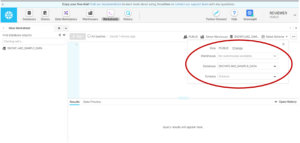
1. Creating a custom roleIn this demonstration we’ll be creating a new role intended to be used by a librarian, who only needs access to a table of authors, books, and the relationship between the two. I set up a new user on the Snowflake account (called ‘librarian’), so I can check that the custom role has been set up correctly later.The new user account is created using the CREATE USER command and a default warehouse and namespace (database or schema) are assigned. It is important to note that even though a default warehouse and namespace is given, this does not give the user any permissions at this stage.Note: Make sure you use the ACCOUNT_ADMIN role to do this as only this role can create a new user account Logging into the new user account, you can see that although the new user has been created, the only role they have access to is PUBLIC and they have no access to any data warehouse, databases or schema.
2. Creating a custom role
To create a custom role, first the role object is created using the CREATE command with the ROLE argument given. This creates an empty role with no permissions granted. Again, it is important to ensure you are set to ACCOUNT_ADMIN for this to work.
3. Granting privileges to the role
With the custom role now created, we need to assign access privileges to the role. As mentioned at the beginning, this role is to be used by librarians who only require access to three tables, authors, books and the relationship between the two (book_to_author). In Snowflake, privileges can be assigned using the GRANT command.One important thing to remember when assigning privileges to a role is that access to each level of the data structure hierarchy must be granted. This means you cannot jump right to granting access to a table if you have not already given the role access to the warehouse, database, and schema. As seen below, the role is granted access to the COMPUTE_WH warehouse first, before granting access to the LIBRARY_CAR_CATALOG database and PUBLIC schema. Once the role has access to the relevant schema, we can grant it access to the relevant tables; AUTHOR, BOOK and BOOK_TO_AUTHOR. Now the role has access to these three tables.
4. Assigning the user to the role
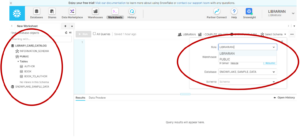
The last stage in the process is to assign the user to the newly created role. The GRANT command is used again with the ROLE argument given.![]() Now logging back into the librarian account, we can see that the LIBRARIAN role is now available to our new user (right) and the three tables are also available (left).
Now logging back into the librarian account, we can see that the LIBRARIAN role is now available to our new user (right) and the three tables are also available (left).


