23 Nov 23
IoT Remote Monitoring: Creating a DIY Temperature and Humidity Sensor

Ewan West
Introduction
The Internet of Things (IoT) refers to a paradigm that refers to networked ‘things’, everyday objects augmented with technologies such as sensors to allow them to seamlessly collect and communicate data between not only themselves but the internet as a whole. The most common ‘things’ encountered in everyday life often include ‘smart’ home devices, such as the Amazon echo or the Ring video doorbell, lights or smart energy meters, and are often looked at as consumer products or for business use, however with the advances in technology, it is entirely possible to create your own IoT project, often with little experience or cost. In this article, I will cover a simple IoT remote monitoring project I have created previously, with an emphasis on low-cost and real-time data streaming.
Designing the Project
For this project, I had decided to create an IoT remote monitoring system for temperature and humidity, which would be able to send messages to both my smartphone and my desktop PC.
IoT projects usually have three areas that need to be covered, namely the sensor layer, the transport layer and the application layer. When combined with a microcontroller (a small device that tells the device what to do), they constitute the entire IoT remote monitoring system, this makes up the whole project. At a high-level, the sensor layer represents the actual sensor that gathers data, the transport layer dictates how the data will be transmitted (this is often quite difficult with IoT projects due to the low computing power of microcontrollers), and the application layer refers to what actually happens with the data once it is collected, for example stored in a database or used for analysis.
The sensor layer in this IoT remote monitoring project consisted of a DHT-11 temperature and humidity sensor, but for other projects, this can be swapped out for a more suitable sensor, such as a light sensor. For the transport layer, a way to connect to the internet was required, and so a hybrid microcontroller that also acted as a WiFi chip was used, the ESP8266-01. For most projects similar to this, WiFi is likely the method of choice, but some projects may rely on technologies such as Bluetooth or LoRaWAN to transmit data.
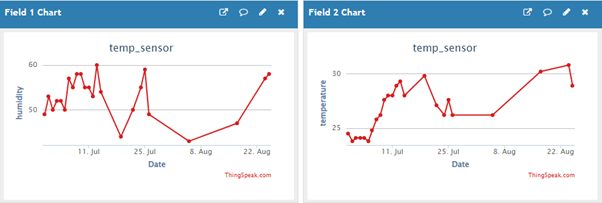
The application layer for this project was ThingSpeak, a popular IoT platform that allows storing of data via the use of its API. The free version allows updates every 15 seconds, which is suitable for a IoT project of this scope, but projects that are very time-critical may require the paid version. Below is an example of an auto-generated graph by ThingSpeak, displaying the change in temperature over time.
The second part of the application layer, which in this instance is to transmit the data from ThingSpeak to a smartphone or desktop device, although some IoT remote monitoring projects may opt to simply store the data for analysis at a later time. This project uses BotFather, an API developed by the messaging app Telegram, allowing for communication with other devices, notably easier than using another form of notification.
Making the project
The implementation of the IoT remote monitoring project required some basic electronics knowledge, which I did not have before creating the device, but most of the components required, such as the sensor, have instructions as to how to set them up, and are not too difficult to put into practice. Some essentials of any such project (that does not include soldering) involve using a breadboard and jumper wires to connect the components together, as well as a power supply. An image of the device is included below.
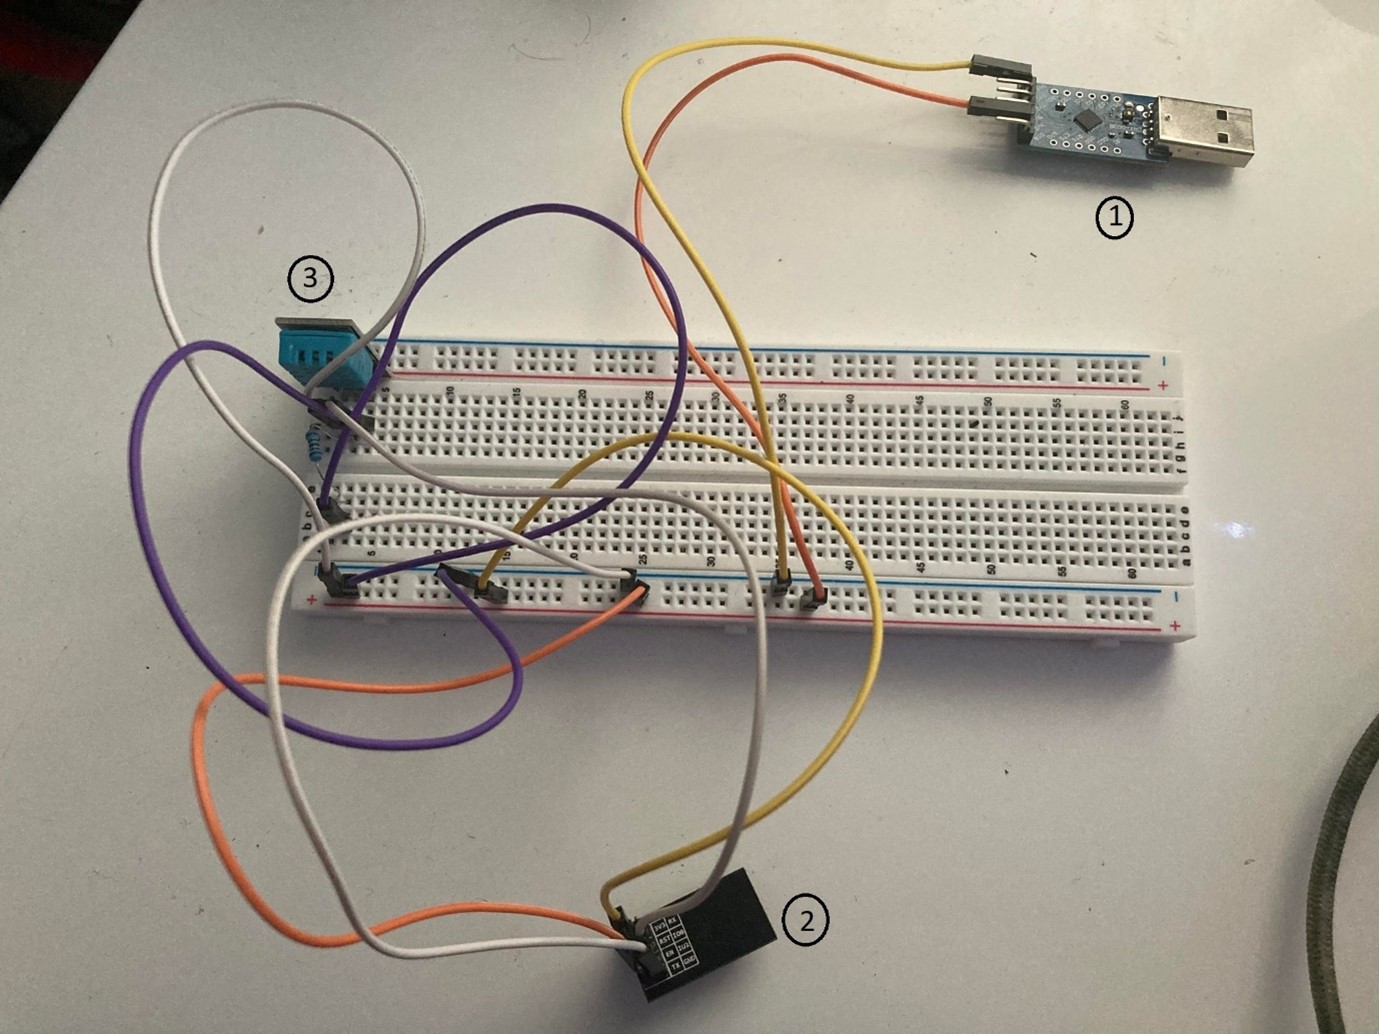
The USB device labelled (1) is what powers the device, which only requires 3.3V of power, and also enables the device to be used portably with the use of a power bank or portable charger.
The ESP8266 is labelled (2), and is ultimately the core of the project, as it enables both connection to WiFi (I used my mobile phone as a hotspot for mobile use) and also stores the firmware that sends data gathered from the DHT-11 sensor, labelled (3), to ThingSpeak. The configuration of the wires is important, to ensure everything remains in series, and there is also a 10k Ohm resistor connected. The diagram below shows a more detailed connection between the DHT-11 and the ESP8266 (the ESP used in the below diagram works slightly differently, essentially acting as the power supply (1) and the WiFi chip (2)).

The firmware that is flashed onto the ESP8266 is permanent code that runs whenever powered, and so a simple script is all that is needed. For this project, C++ was used, coded in the Arduino IDE, which provides support for many IoT devices. There are two main elements to the firmware, one being reading data from the DHT11 sensor (using a supporting library), and the other sending data to ThingSpeak. The psuedo-code for each element is shown below.
DHT11:
- Define variables;
- Temp, humidity
- Check connection to DHT11
- Every 15 seconds;
- Read from DHT11
- Update temp, humidity variables
ThingSpeak:
- Define variables;
- Network SSID
- Network passphrase
- ThingSpeak API Key
- ThingSpeak channel ID
- Attempt to connect to WiFi
- Every 15 seconds;
- Accept temp, humidity variables
- Send humidity value to ThingSpeak channel 1
- Send temp value to ThingSpeak channel 2
Once the above is completed, this is essentially a fully functional IoT project! There are plenty of avenues to go onto from here, or augment the original device to add complexity, but for my project I decided to create a notification service for real-time updates on my phone (which can also be accessed on desktop via Telegram). For this, ThingSpeak’s Read API is used to access the data in the channels, as opposed to the Write key used in the ESP8266’s firmware. This API can be easily accessed in Python, which returns a JSON object, as shown below.
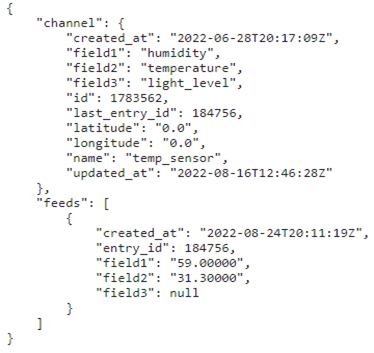
From here, the relevant data required is ‘field1’ and ‘field2’, which are both easily accessible within Python, and renamed to something more meaningful (such as humidity and temperature respectively). The final step is using Telegram’s API, BotFather, which sends a message to a channel I had set up, which can be formatted in Python. The result is as follows:
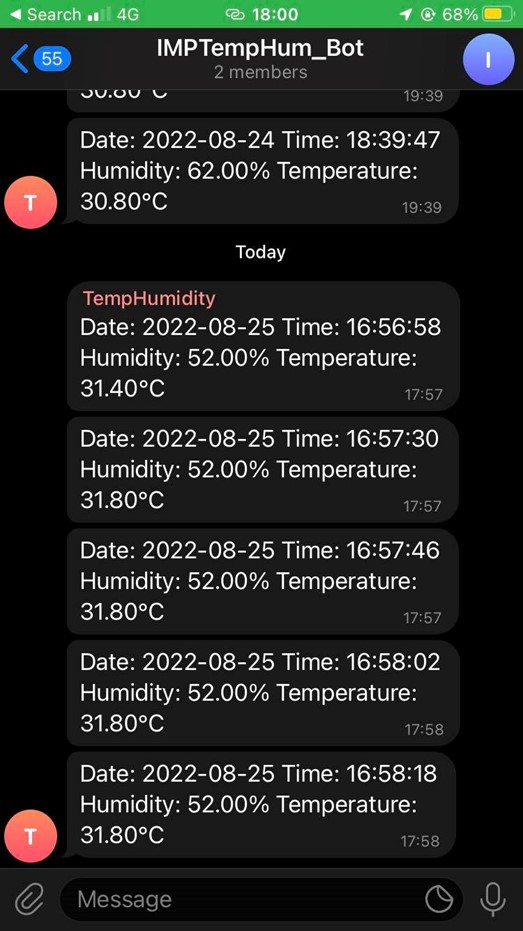
The interval set in this instance is 15 seconds, which can easily be changed in the Python back-end script, and BotFather has capabilities to also send requests, such that updates are only sent when a message is sent via Telegram.
Conclusion
This is an overview of a relatively simple IoT project, the components of which can easily be changed or modified for another project, and carries the virtue of being both a fun device to make and also being useful. With sensors becoming cheaper and more widely available, the accessibility of such a project becomes even easier, and having the ability to create your own data sources with ease allows further avenues of cleaning and analysing the data for future projects.
Interested in joining our diverse team? Find out more about the Rockborne graduate programme here.
Related posts
Life at Rockborne20 Jun 25
Federated Learning: The Future of Collaborative AI in Action
Federated Learning: The Future of Collaborative AI in Action The way we build, deploy, and govern AI is evolving, and so are the expectations placed on organisations to do this...
09 Sep 24
Tips to Succeed in Data Without a STEM Degree
By Farah Hussain I graduated in Politics with French, ventured into retail management, dabbled in entrepreneurship, a mini course in SQL and now… I am a Data Consultant at Rockborne....
Farah Hussain
15 Apr 24
Game Development at Rockborne: How is Python Used?
Just how is Python used in game development? In this blog post, we see the Rockborne consultants put their theory into practice. As the final project in their Python Basics...